Table of Contents
| DATA ANALYTICS REFERENCE DOCUMENT |
|
|---|---|
| Document Title: | Document Title |
| Document No.: | 1569148014 |
| Author(s): | Gerhard van der Linde, Rita Raher |
| Contributor(s): | |
REVISION HISTORY
| Revision | Details of Modification(s) | Reason for modification | Date | By |
|---|---|---|---|---|
| 0 | Draft release | Document description here | 2019/09/22 10:26 | Gerhard van der Linde |
52957 - Data Representation
Week 1 - Introduction
The syllabus has 4 learning outcomes
- Compare data models and architecture used in applications
- Write software applications that adhere to common standards and protocols.
- Explain the basic mechanisms by which application data is transmitted across the internet.
- Design and Utilise application programming interfaces for interacting with data sources.
Which in practices means:
- XLM and JSON
- How the data is transferred ie HTTP and Restful APIs
- Being able to create a web-application
Indicative Schedule

- 40% - ongoing assessments
- 60% - Project
Week 2 - XML and DOM
xml → eXtensible Markup Language
- Extensible - Designed to accommodate change
- Markup - Annotates text
- Language - Set of rules for communication
<?xml version="1.0" encoding="UTF-8"?>
<book isbn-13="978-0131774292" isbn-10="0131774298">
  <title>Python Programming</title
  <publisher>Prentice Hall</publisher>
  <author>Peter van der Linden</author>
</book>
- XML looks like HTML, but it is different.
- XML was designed to carry/represent data - with focus on what data is
- XML tags are not predefined like HTML tags are
- HTML was designed for browser to use to display - It has predefined tags
- XML's purpose is to represent information in text form
- XML does not do anything (either does HTML)
- There are no pre-defined tag names - you make them up yourself
- XML has a tree-like syntax.
- The document Object Model (DOM) can be applied to XML.
<?xml version="1.0" encoding="UTF-8"?> <root-element attribute-name="attribute-value"> <child name="value">Text</child> <child name="value">Text</child> <child>< is an example of encoding</child> <lone-warrior/> </root-element>

| Declaration | XML documents should have a single line at the start stating that it's xml, the versionof xml it is and an encoding |
| Root Element | XML must have a single root element that wraps all others |
| Elements | XML is structured as elements, which are enclosed in angle brackets. Elements must have a closing tag. |
| Tag | <Tags> indicate the start and the end of each element(end tag indicated with </tagname>) |
| Attributes | Elements can have attributes, which are name-value pairs within the angle brackets. A given attribute name can only be specified once per element. |
| Entity References | Certain characters must be escaped with entity references, e.g < for<. |
| case sensitive | Everything in XML is case sensitive. (HTML is not) |
| Plain text | Or Data, can be inside the tags |
Exercise
- Create an xml file that stores information for a breakfast menu.
- It should contain food items, and the price, description and calories for each item.
<?xml version="1.0" encoding="UTF-8"?>
<breakfast_menu>
  <food>
     <name>Belgian waffles</name>
     <price>$5.95</price>
     <description>Two of our famous Belgian Waffles with syrup</description>
     <calories>650</calories>
  </food>
    <food>
     <name>Strawberry Belgian waffles</name>
     <price>$7.95</price>
     <description>Light Belgian waffles covered with strawberries and whipped cream</description>
     <calories>900</calories>
  </food>
</breakfast_menu>
DOM
- The Document Object Model (DOM) is how programs store xml internally
- It provides a model of the XML as a structured group of nodes that have three properties
- Type (element, tree, comment, atrribute)
- Name(tag name or attribute name)
- Value (value of the text node, comment or attribute value)
- Programs can use the DOM to manipulate the XML(or HTML)
- E.g in JavaScript we can use commands like:
- document.createElement
- document.createTextNode and
- document.element.appendChild to add to the DOM
- document.getElementByID to access elements to the DOM

HTML
- Using W3Schools to learn html
- The page tags
<html>, <head>,<body> - The attribute id and class (for later)
- The
<div>tag - The table tags
<table>, <tr>, <th>, <td> - The form tags
<form>, <input>, <button>, <select>, <option>
I am not going through how to make pages look nice, that is a whole course in itself. Know that CSS exists and is used to format webpages. The script tag I will go through next week.
Week 3 - JavaScript
Overview
- There is a lot to learN
- You can let some of this spill into next week(there is not so much in next weeks topic)
- The purpose of this week is so that you create a simple client side web-application that can perform CRUD operations on some data
- We will link it later in the course to a server
Files on this topic
- This video
- Lecture on JavaScript in two parts
- The powerpoint file used in the lectures
- A word document with the exercises from the lectures
- The lab as a pdf
- A lab as a pdf
- A link to githup
- The code I wrote for exercises
- The code for the lab
JavaScript 1
Overview
- What you will be able to do: Lab
- CSS
- Hidden, block and inline display
- Disabled
- JavaScript(W3School)
- Overview of the language
- DOM Manipulation
- Attributes
- Setting values and innerHTML
- Theory
- Exercise
- Demonstration(Rinse and Repeat)
CSS (Cascading Style Sheets)
- Too much for this course
- Style can de defined:
- In another file(with selectors)
- In the head(with selectors)
- In the element itself
- Make an element visible/hidden
<div style="display:block">
text
</div>
- Put the keyword disabled in an element to make it disabled
<input type="text" value="blah" disable/>
Exercise 2.1
Write some html that has a hidden element
<html>
  <head>
    <title>2.1</title>
  </head>
  <body>
    <div style="display:none">Hi Mom</div>
    <div style="display:block">div1</div>
    <div style="display:block">div2</div>
    <div style="display:inline">div3</div>
  </body>

</html>
JavaScript
- Inside
<script></script>tags
<script>
console.log("hello world")
</script>
- bLOCKS HAVE {} (not indents like in python)
<script>
function sayHelloAgain(){
  console.log("helloagain")
  }
  sayHelloAgain()

</script>
Exercise: Print out Hello World
<html>
  <head>
    <title>e2.2</title>
  </head>
  <body>
    hello
    <script>
    console.log("Hello world")

    function sayhelloagain(message){
       console.log("Hello" + message);
    }
    sayhelloagain("Andrew")
    </script>
  </body>

</html>
JavaScript To/FROM HTML
- Onclick attribute
<button onclick="myFunction('hello')">click me</button>
- Document getElementById
<div id="messageOut"></div>
document.getElementById("messageOut").innerText = message
Exercise 2.3
Make a webpage with an input and a button, when the user clicks the button then the contents of the input will display in another div.
<html>
  <head>
    <title>e2.2</title>
  </head>
  <body>
    <input id="name" type="text" />
    <br/>
    <button onclick="buttonClicked()">Click me</button>
    <br/>
    <div id="output">output will go here</div>
    <script>
    function buttonClicked(){
        var output =document.getElementById('name').value
        document.getElementById('output').innerText = output
    }

    </script>
  </body>

</html>
JavaScript 2
Variables
- Define a variable with the var keyword, eg var age =21
- Variable types are defined by the value, they can be
- Integre
- Float
- String
- Boolean
- Null
- Undefined
- Object
- Array
- function
var i = 12
var fl = 3.3
var firstName = "andrew"
var lastName = "O'Neill" //or 'O\'Neill'
var admin = true
var foo = null
var dunno //= undefined
var car = {}
var books = []
var fun = function(){console.log('in fun')}
Objects
- Properties can be added to objects
car.reg = '12 mo 1234'
car.make = "ford"
- Or defined using JSON
var employee = { name:'joe', role:"Manager"}
- Use JSON.stringfy() to output
console.log("car" +JSON.stringify(car))
Exercise 2.4
Create a book object as a variable with Title, author and ISBN and display it in the console
<html>
  <head>
    <title>2.4</title>
  </head>
  <body>

    <script>
var book = {}
book.title= "Harry Potter"
book.author = "JK"
book.isbn="1234"
console.log("book is "+ JSON.stringify(book))


    </script>
  </body>

</html>
Manipulate Display
- We can make am element visible and hidden
document.getElementById("div1").style.display = "block"
document.getElementById("div2").style.display = "none"
- or we can disable a button
document.getElementById("button1").disabled = true
Exercise 2.5:
Make a webpage that has two div, only one should be visible at a time, each <div> will have a button that will make the other <div> visible (and hide itself)
<html>
  <head>
    <title>2.4</title>
  </head>
  <body>
<div id="div1" style="background-color:royalblue">
<br/>
some text
<br/>
<button onclick="showDiv2()">Show Div2</button>
</div>
<div id="div2" style="background-color:red;display:none">
<br/>
some text
<br/>
<button onclick="showDiv1()">Show Div2</button>
</div>

    <script>
function showDiv2(){
    document.getElementById("div1").style.display = "none";
    document.getElementById("div2").style.display = "block";
}

function showDiv1(){
    document.getElementById("div2").style.display = "none";
    document.getElementById("div1").style.display = "block";
}

    </script>
  </body>

</html>
Control
if statement
    if(condition){
         do stuff
      }else {
      do other stuff
      }
if(value < 10){
   outputElement.innerText = "too low"
   }else if(value >20){
   }else{
     outputElement.innerText ="goo enough"
   }
Exercise 2.6:
Make a web page that has a text box, when the content of the text area changes the page will display whether the value entered is greater or less than 10 or equal to 10
<body>
        <input type="number" onchange="checkNumber(this)"/>
        <br/>
        <div id="output">
            output here
        </div>
        <script>
            function checkNumber(inputElement){
                var value = inputElement.value
                if( value <10){
                    document.getElementById("output").innerText = "too low"
                }else if (value > 10){
                    document.getElementById("output").innerText = "too high"
                }else{
                    document.getElementById("output").innerText = "just right"
                }
            }
        </script>
    </body>
For loop
- Simple count
 for(var i =0;i<10;i++){
   console.log(i);
}
- Iterate an array
var names=['Joe', 'Mary', 'Fred']
- Iterate an object
var book ={title:'harry Potter and something',author:'JKR', isbn:"12345"}

for(propName in book){
   bookoutput += propName+'='+book[propName]+'<br/>'
}
Exercise 2.7:
- Make a webpage that outputs 1 to 10(or N)
<!DOCTYPE HTML>
<html>
  <head>
    <title>e2.7</title>
  </head>
<body>

<script>
    for(var i=0;i<10;i++){
        console.log(i)
    }
</script>
</body>
</html>
- Make a webpage that outputs all the values of an array
<!DOCTYPE HTML>
<html>
  <head>
    <title>e2.8</title>
  </head>
<body>
    <div id="output">
        output  here
    </div>

<script>
    for(var i=0;i<10;i++){
        console.log(i)
    }
    var names=['Joe', 'Mary', 'Fred']
var output = ""
    for(name of names){
        output += name + '<br//>'
    }
document.getElementById("output").innerHTML = output
</script>
</body>
</html>
DOM
- Get Element By id, we have seen this already
- QuerySelector: The querySelector function searches all the child nodes of a particular element for nodes that match the query, and returns the first one (it is like CSS selectors and JQuery selectors, see later).
- Name name of tag
- #id a node with id=“id”
- .classname A node with class=“classname”
- [atName=“atVal”] A node with the attribute atName=“atValue”
- More data at https://www.w3schools.com/cssref/css_selectors.asp
Exercise 2.8:
Create a webpage with multiple inputs and a button, when the user hits the button read all the inputs, store the values into a class and output the class to the console
<body>
        <div id="myForm">
            First name: <input type="text" name='firstName'/><br/>
            Last name: <input type="text" name='lastName'/><br/>
            age: <input type="text" name='age'/><br/>
            <button onclick="doForm()">go</button>
        </div>
        <script>
         function doForm(){
             var employee ={}
             var form = document.getElementById("myForm")
             employee.firstName = form.querySelector('input[name="firstName"').value
             employee.lastName = form.querySelector('input[name="lastName"').value
             employee.age = form.querySelector('input[name="age"').value
             console.log("form data "+JSON.stringify(employee))
         }

        </script>
    </body>
Child Nodes
- Consider
<table>
  <tr>
    <td>data1</td>
    <td>data2</td>
    <td><button onclick="doRow(this)">output</button></td>
  </tr>
</table>
To get the content of the first cell, you need to get the child of that cell and its text value
rowElement.cells[0].firstChild.textContent

Parent Nodes
- Similarly we can look up the DOM Tree
- Consider the html in the previous slide
- What is the relationship between the row element and the button?
<td>is the parent and<tr>is the<td>
so we can access the <tr> by:
var rowElement = buttonElement.parentNode.parentNode
//or
Var rowElement = buttonElement.closest('tr')

Exercise 2.9
Write the code so that when the user clicks on the button in a row, the contents of the cells in that row are stored in an object and outputted to the console.
<body>
        <table>
            <tr>
                <td>how now</td>
                <td>brown cow</td>
                <td><button onclick="doRow(this)">output</button></td>
            </tr>
        </table>

        <script>
            function doRow(buttonElement){
                var rowElement = buttonElement.parentNode.parentNode
                var data={}
                data.cell1 = rowElement.cells[0].firstChild.textContent;
                data.cell2 = rowElement.cells[1].firstChild.textContent;
                console.log(JSON.stringify(data))

            }

        </script>
    </body>
Add to DOM Tree
- Add element
var para = document.createElement("p");
var node = document.createTextNode("This is new");
para.appendChild(node);
- Add row
var rowElement =table.Element.insertRow(-1)
- Add cell
var cell = rowElement.insertCell(0);
- Add attribute
rowElement.setAttribute("id", car.reg)
Exercise 2.9.2
Create a button that when it is clicked adds a row to the table(above) with data
function createRow(){
            var tableElement = document.getElementById('mainTable')
            var data = {cell1:'hi',cell2:'bye',cell3:'thanks for the fish'}
            var rowElement = tableElement.insertRow(-1)
            var cellElement = rowElement.insertCell(0)
            cellElement.innerHTML = data.cell1;
            cellElement = rowElement.insertCell(1)
            cellElement.innerHTML = data.cell2;
            cellElement = rowElement.insertCell(2)
            cellElement.innerHTML = data.cell3;

        }
Week 4 - HTTP and Web Scraping
What is HTTP?
- HTTP: HyperText Transfer Protocol
- HyperText Text with Links
- Transfer communication of data
- Protocol set of rules for communication
- HTTP Versions
- HTTP/1.0 first version -
- HTTP/1.1 -
- HTTP/2.0 use is growing (current version)
- Browsers use HTTP

HTTP Request

HTTP Response

URL: Universal Resource Locator
- Resources can be anything: text, images, pages, files or videos.
- You see URLs at the top of browsers
- E,g http://gmit.ie
Parts of URL


Encoding
- Special Characters need to be encoded (eg space ?:/& etc)
- Incorrect
http://ps.com/martin Kenirons
- Correct
http://ps.com/martin%20Kenirons

Further Reading
- A more detailed look at http
http://www.jmarshall.com/easy/http/
- Interview with Tim Berners Less (inventor of the Web)
Web Scraping Part 1
This lecture
- Reading web pages with Request
- Reading last weeks html file
- Using BeautifulSoup4 to go through the html
- Searching down (and up) the DOM file
- Saving Content in a csv file
- The dark art of web scraping
Request Module
Request module
import requests
page = requests.get("http://dataquestio.github.io/web-scraping-pages/simple.html")
print(page)
print("------------")
print(page.content)
Use BeautifulSoup to prettify
import requests
from bs4 import BeautifulSoup

page = requests.get("http://dataquestio.github.io/web-scraping-pages/simple.html")

print(page)
print("------------")
print(page.content)
soup1 = BeautifulSoup(page.content, 'html.parser')
print(soup1.prettify())
Parsers

Read in from a file
- I assume that you have covered reading from files before.
- This just opens a file and sends its contents to BeautifulSoup
- BeautifulSoup parses the file and stores a DOM tree in memory
from bs4 import BeautifulSoup

with open("../week02/carview2.html") as fp:
   soup = BeautifulSoup(fp, 'html.parser')

print(soup.prettify())
To search the DOM Tree
- For any element .tagname will find the first occurance of it
- You can use find() this will allow you to find the first element by id and/or class
aElement = someElement.find(id="someID")
aElement = someElement.find(class="aClass")
aElement = someElement.find(div, class="aClass")
- You can use findAll to return a list of elements that match the search criteria
listOfElement = someElement.findAll(tr, class="aClass")
Navigate the DOM tree
- .children
- .parent
- .parents(a list of parents)
from bs4 import BeautifulSoup

with open("lab02-JS/carviewer2.html") as fp:
   soup = BeautifulSoup(fp, 'html.parser')


print(soup.tr)
from bs4 import BeautifulSoup

with open("lab02-JS/carviewer2.html") as fp:
   soup = BeautifulSoup(fp, 'html.parser')

rows = soup.findAll("tr")
for row in rows:
    print(row)
from bs4 import BeautifulSoup

with open("lab02-JS/carviewer2.html") as fp:
   soup = BeautifulSoup(fp, 'html.parser')

#print(soup.prettify())
#print(soup.tr)
rows = soup.findAll("tr")
for row in rows:
    #print(row)
    datalist = []
    cols = row.findAll("td")
    for col in cols:
        datalist.append(col.text)
    print(datalist)
Using CSV Package
- Write to a csv(comma delimiter file)
- You can read a csv with Excel
- We could create an excel file in python, maybe later
import csv

employee_file = open('employee_file.csv', mode='w')
employee_writer = csv.writer(employee_file, delimiter=',', quotechar='"', quoting=csv.QUOTE_MINIMAL)

employee_writer.writerow(['John Smith', 'Accounting', 'November'])
employee_writer.writerow(['Erica Meyers, what', 'IT', 'March'])

employee_file.close()
Web Sraping part 2
Finding what you want from a web page
- This is a dark art
- Web pages are not designed to be read like this
- If a webapplication wants you to be able to extract data they use JSON (they used to use XML in RSS feeds).
- Case Study: Get the price and address from myhome.ie
- We will need the URL
- Don’t use inspect because a lot of webpages use javascript to modify themselves, we need to use viewsource or curl
- This is a dark art (yep I am saying it again)
- ID and class are what you are looking for, possibly tag
HTTP and URL's
https://learnonline.gmit.ie/course/view.php?id=1318&blah=8
https://andrewbeattycourseware:pass@github.com/andrewbeattycourseware/dataRepresentation.git
You can also have a username:password pair before a @ if you need to log into the host There are other authentication methods (EG Oauth)
- web_scraping.py
- import requests
- import csv
- from bs4 import BeautifulSoup
- url = "https://www.myhome.ie/residential/mayo/property-for-sale?page=1"
- # load the page from the above url in the object page.
- page = requests.get(url)
- #parse only the html from page.content
- soup = BeautifulSoup(page.content, 'html.parser')
- #open a file and csv writer objects
- home_file = open('week03MyHome.csv', mode='w', newline='\n', encoding='UTF-8')
- home_writer = csv.writer(home_file, delimiter=',', quotechar='"', quoting=csv.QUOTE_MINIMAL)
- #parse the listings from soup using the class label
- listings = soup.findAll("div", class_="PropertyListingCard" )
- #loop trhough the listings
- for listing in listings:
- #create an empty list for writing out to csv
- entryList = []
- #parse and append price to listing
- price = listing.find(class_="PropertyListingCard__Price").text.strip()
- entryList.append(price)
- #parse and append address to listing
- address = listing.find(class_="PropertyListingCard__Address").text.strip()
- entryList.append(address)
- #write parsed data to the csv file
- home_writer.writerow(entryList)
- #close the file
- home_file.close()
Note: Note the specification for 'UTF-8' encoding and strip() commands to clean the parsed data and specify the newline characters
"€625,000","Curraghmore, Belcarra, Castlebar, Co Mayo"
"Reserve Not To Exceed €80,000","April Cottage (Folio MY51001F), Balloughadalla, Killala, Co. Mayo"
"AMV €30,000","C. 4.09 Acres of Land, Dooagh, Achill, Mayo"
"€140,000","15 Riverside Drive, Ballina, Mayo"
"Reserve Not To Exceed €110,000","Riverbank House, Bachelors Walk, Abbeyhalfquarter, Ballina, Co. Mayo"
"€115,000","Croghan, Killala, Mayo"
"€195,000","Carrowbaun, Westport, Co Mayo, F28K298"
"€235,000","3 Rosmore, Newport, Co Mayo, F28 VF38"
"AMV €245,000  -€30,000 on 5th Oct 19","ONLINE AUCTION Camcloon More, Newport, Mayo"
"€250,000","Roonith, Louisburgh, Mayo"
"€125,000","8 Rathkelly , Ballinrobe, Mayo"
"€179,500","5 Ballyhaunis Road, Knock, Co. Mayo"
"€175,000","1 Cinnamon Wharf, The Quay, Westport, Co Mayo, F28 K6W8"
"Reserve Not To Exceed €15,000","Ballymunnelly (Folio MY14396F), Bellacorick, Co. Mayo"
"Reserve Not To Exceed €130,000","Loughrusheen, Castlebar, Co. Mayo"
"€198,000","13 Church Manor, Ballina, Mayo"
"€110,000","Cappaghduff East, Tourmakeady, Mayo"
"€215,000","12 Rushbrook, Claremorris, Mayo"
"€120,000","Knockfin, Westport, Mayo"
"Reserve Not To Exceed €40,000","5A and 5B, Main Street, Ballyhaunis, Co. Mayo"
"€45,000","Main Street, Ballycastle, Mayo"
References
- A very good tutorial, takes it from html and builds to making a python program to read it. Be warned he is using python2 and we are using python3, the main difference is with the print statements.
https://www.dataquest.io/blog/web-scraping-tutorial-python/
- Documentation on BeautifulSoup4
https://buildmedia.readthedocs.org/media/pdf/beautiful-soup-4/latest/beautiful-soup-4.pdf
Week5 - JSON, AJAX and REST
HTTP 2: methods and Response Codes
Request Methods
| Method | Description | In RESTful API |
|---|---|---|
| GET | Retrieves a Resource(s) | Read |
| POST | Updates/creates/changes a Resource | Create |
| PUT | Used more to update a Resourse | Update |
| DELETE | Remove a resourse | Delete |
| HEAD | Retrieves header info | |
| TRACE | Used for Debugging | |
| OPTIONS | Retrieve allowable options | |
| PATCH | Partial resource modification | |
| CONNECT | Set up a tunnel for other traffic to pass through HTTP |
HTTP Methods GET vs POST
| GET | POST | |
|---|---|---|
| Security | Parameters are visible to the user and browser History. | POST is a little safer than GET because the parameters are not stored in browser history or in web server logs |
| Never use GET when sending passwords or other sensitive information! | ||
| Back Button | harmless | Data will be resubmitted |
| Bookmarked | Can be bookmarked | Parameters are not bookmarked |
| Cached | Can be cached | Not cached |
| Encoding type | application/x-www-form-urlencoded | application/x-www-form-urlencoded or multipart/form-data. Use multipart encoding for binary data |
| History | Parameters remain in browser history | Parameters are not saved in browser history |
| Visibility | Data is visible to everyone in the URL | Data is not displayed in the URL |
| Restrictions on data length | data length | No Restrictions |
| Yes, when sending data, the GET method adds the data to the URL; and the length of a URL is limited (maximum URL length is 2048 characters) | ||
| Restrictions on data type | Only ASCII characters allowed | No restrictions. Binary data is also allowed |
HTTP Response
Requests and responses both have this format: • Intial line.
- Zero or more header lines.
- A blank line.
- Optional message body (e.g. a HTML file)
HTTP/1.1 200 OK
Date: Mon, 27 Jul 2009 12:28:53 GMT
Server: Apache/2.2.14 (Win32)
Last-Modified: Wed, 22 Jul 2009 19:15:56 GMT
Content-Length: 88
Content-Type: text/html
Connection: Closed
<html>
 <body>
 <h1>Hello, World!</h1>
 </body>
</html>
Status codes
| Code Range | Status |
|---|---|
| 100 – 199 | Informational |
| 200 – 299 | Successful |
| 300 – 399 | Redirection |
| 400 – 499 | Client Error |
| 500 – 599 | Server Error |
| Code | text | description |
|---|---|---|
| 200 | OK | Successful |
| 201 | Created | Resource created |
| 204 | No Content | The requested resource is empty |
| 400 | Bad Request | Bad Syntax |
| 401 | Unauthorised | Client might need to be authenticated |
| 403 | Forbidden | Operation not allowed |
| 404 | Not Found | Resource does not exists |
| 500 | Internal Server Error | Something went wrong during processing |
More at https://www.restapitutorial.com/httpstatuscodes.html
Summary
- HTTP request have methods
- HTTP responses have status codes
(These are used in restful APIs)
JSON
- Javascript Object Notation
- JavaScript - A scripting/programming language.
- Object - Groups of name-value pairs.
- Notation - Set of rules for representing objects.
- Human readable.
- Is just text.
- Open standard.
- Data interchange format.
{
  "employees": [
    {"firstName":"John", "lastName":"Doe"},
    {"firstName":"Anna", "lastName":"Smith"},
    {"firstName":"Peter", "lastName":"Jones"}
  ]
}
// Turning text into a JavaScript object.
var obj = JSON.parse(text);
// obj is an object.

// Turning a JavaScript object into text.
var text = JSON.stringify(obj);
// text is a string.
Syntax
- Name/Value pairs separated by a colon.
“name”: “Martin” - Objects identified by curly braces.
{ } - Lists identified by square brackets.
[] - All strings (names if space in it) use double quotes (not single).
“Martin”
Examples
  Numbers   - 123.456
  Boolean   - true
  Objects   - {"name": "Ian"\}
  Functions - function(){//commands}
  Strings   - "Hello, world!"
  Arrays    - [1,2,3]
  null      - null
Consider
"employees":[
  {"firstName":"John", "lastName":"Doe"},
  {"firstName":"Anna", "lastName":"Smith"},
  {"firstName":"Peter", "lastName":"Jones"}
]
Exercise (not an assignment!):
- Add two New employees to the above JSON?
- Extend the JSON to include address?
- Extend the JSON object to include age?
JSON in the wild
{
    "time": {
        "updated": "Oct 16, 2019 15:03:00 UTC",
     },
    "disclaimer": "This data was produced from the CoinDesk Bitcoin Price Index (USD). ",
    "chartName": "Bitcoin",
    "bpi": {
        "USD": {
            "code": "USD",
            "symbol": "$",
            "rate": "7,968.2517",
            "description": "United States Dollar",
            "rate_float": 7968.2517
        },
             "EUR": {
            "code": "EUR",
            "symbol": "€",
            "rate": "7,209.3474",
            "description": "Euro",
            "rate_float": 7209.3474
        }
    }
}
AJAX (with Jquery)
| Asynchronous: | Does not block code, the return function gets called when complete |
|---|---|
| Javascript: | The language |
| And XML: | Well not much anymore, usually JSON or html is used |
More info at https://www.w3schools.com/xml/ajax_intro.asp
We will use AJAX with Jquery not the plain JavaScript version: https://www.w3schools.com/jquery/jquery_ajax_intro.asp
What does AJAX do?
- Allows us to call up a resource with HTTP from inside a web page
JQuery
- We will be using JQuery for AJAX,
- JQuery is a javascript library that make finding and manipulating elements in the HTML DOM tree easier.
- I am not going into detail about JQuery now
- You will need this magic line of code in the header of any page that uses Jquery
<head>
  <script src="https://ajax.googleapis.com/ajax/libs/jquery/3.4.1/jquery.min.js"></script>
</head>
$.AJAX function
- We will use the $.AJAX function, it takes on parameter, a JSON Object that describes everything.
$.ajax({the object that describes everything});
$.ajax({
"url": "https://api.coindesk.com/v1/bpi/currentprice.json ",
     "method":"GET",
     "data":"",
     "dataType": "JSON",
     "success":function(result){
     	console.log(result);
      },
      "error":function(xhr,status,error){
          console.log("error: "+status+" msg:"+error);
      }
}
)
| url: | the url to call |
|---|---|
| method: | the HTTP method |
| data: | parameters (none in this case) |
| datatype: | that is returned JSON or HTML or XML |
| success: | the function to call if this is a success (with the result from server) |
| error: | The function to call if we don’t get a status code in the 200s |
Putting the code together
<html>
    <head>
        <script src="https://ajax.googleapis.com/ajax/libs/jquery/3.4.1/jquery.min.js"></script>
        <title>
            read a simple json
        </title>
    </head>
    <body>
        <button onclick="readJSON()">go</button>
    </body>
    <script>
        function readJSON(){
            $.ajax({
                "url": "https://api.coindesk.com/v1/bpi/currentprice.json ",
                "method":"GET",
                "data":"",
                "dataType": "JSON",
                "success":function(result){
                    console.log(result);
                },
                "error":function(xhr,status,error){
                    console.log("error: "+status+" msg:"+error);
                }
            });

        }
    </script>
</html>
Read the euro price from the JSON
Looking at the JSON you can see the value we are looking for is in the object: bpi.EUR.rate
{
    "time": {
        "updated": "Oct 16, 2019 15:43:00 UTC",
        "updatedISO": "2019-10-16T15:43:00+00:00",
        "updateduk": "Oct 16, 2019 at 16:43 BST"
    },
    "disclaimer": "This data was produced from the CoinDesk Bitcoin Price Index (USD). Non-USD currency data converted using hourly conversion rate from openexchangerates.org",
    "chartName": "Bitcoin",
    "bpi": {
        "USD": {
            "code": "USD",
            "symbol": "$",
            "rate": "7,979.8633",
            "description": "United States Dollar",
            "rate_float": 7979.8633
        },
        "EUR": {
            "code": "EUR",
            "symbol": "€",
            "rate": "7,220.6990",
            "description": "Euro",
            "rate_float": 7220.699
        }
    }
}
So the code to extract it is:
var rate = result.bpi.EUR.rate
console.log(rate);

//document.getElementById("output").innerText = rate;
RESTful API
API
- Application
- Programming
- Interface
I.e. An interface that a program that you write can use to transfer data to another program
SOAP
<?xml version="1.0"?>
<soap:Envelope
xmlns:soap="http://www.w3.org/2003/05/soap-envelope/"
soap:encodingStyle="http://www.w3.org/2003/05/soap-encoding">

<soap:Body>
  <m:GetPrice xmlns:m="https://www.w3schools.com/prices">
    <m:Item>Apples</m:Item>
  </m:GetPrice>
</soap:Body>

</soap:Envelope>
RESTful
- REST stands for Representational State Transfer.
- REST is an architecture describing how we might use HTTP.
- RESTful APIs make use of more HTTP methods than just GET and POST.
- Most HTTP APIs are not RESTful.
- RESTful APIs adhere to a few loosely defined constraints.
- Two of those constraints are that the API is stateless and cacheable.
- Idempotency
- More at https://www.restapitutorial.com/
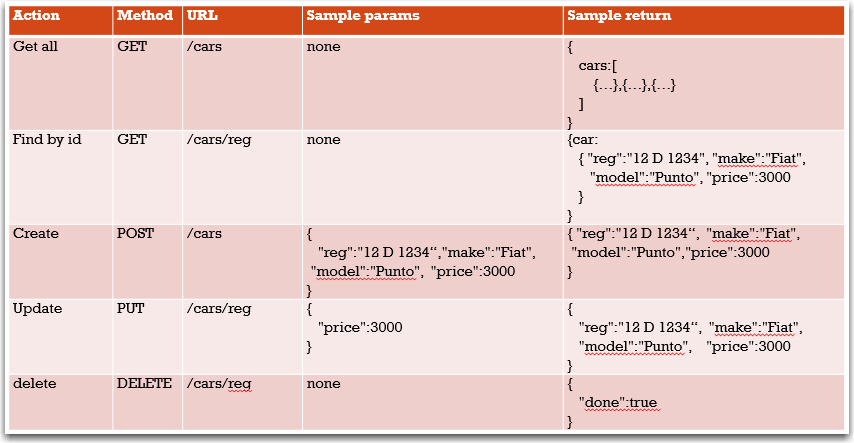
REST Example
| Method | URL | Description | Sample return |
|---|---|---|---|
| GET | /emails | Get all the Emails | [ {id:32,from:”joe@joe.ie”,message:”hi”}, {id:33,from:”me@gmail.ie”,message:”i”}, {id:35,from:”a@b.com”,message:”blah”} ] |
| POST | /emails | Create an Email | {created:true} |
| GET | /emails/32 | Retrieve the Email with id 32 | {id:32,from:”joe@joe.ie”,message:”hi”} |
| PUT | /emails/32 | Update the Email with id 32 | {id:32,from:”joe@joe.ie”,message:”bye”} |
| DELETE | /emails/32 | Delete the Email with id 32 | {deleted:true} |
Stateless
- Statelessness is a REST constraint.
- HTTP uses the client-server model.
- The server should treat each request as a single, independent transaction.
- No client state should be stored on the server.
- Each request must contain all of the information to perform the request.
Cachable
- REST APIs should provide responses that are cacheable.
- Intermediaries between the client and server should be able to cache responses.
- This should be transparent to the client.
- Cacheability increases response time.
- Browsers usually cache resources, in case they are requested again.
- There is usually a time limit on cached resources.
Site that use RESTful APIs
- Facebook, google, stripe, CSO etc
- More at https://any-api.com/
- Python has a lot of packages that handle these APIs (more on week06)
Summary
- REST is a loose set of constraints/guidelines used for making an API
- Stateless
- Cacheable
- Use HTTP methods
- I will be going through this in more detail next week
- We will create a web page that consumes a RESTful API I have created already for a database (CRUD)
Labs
Lab01-simpleJSON.html
<html>
    <head>
        <title>simple json</title>
    </head>
    <script>
        var obj = JSON.parse('{ "isbn": 1234567, "Author": "Gerhard van der Linde","Title" : "the rain in spane falls mailey on the plane"}')

        console.log(obj.Title)

    </script>
</html>
Lab02-json-array.html
<html>
    <head>
        <title>lab02</title>
    </head>
    <body>
        <button onclick="displayJSON()">go</button>
    </body>
    <script>
        function displayJSON(){
            var obj = JSON.parse('{"employees": [{"firstName": "John", "lastName": "Doe"},{ "firstName": "Anna","lastName": "Smith"},{"firstName": "Peter","lastName": "Jones"}]}');
            //for (employee of obj.employees){
            //    console.log(employee.firstName)
            //}
            //var employees=obj.employees;
            obj.employees.forEach(employee => {
                console.log(employee.lastName);
            });
        }
    </script>
</html>
Lab03-ajax-readsimple.html
<html>
    <head>
        <script src="https://ajax.googleapis.com/ajax/libs/jquery/3.4.1/jquery.min.js"></script>
        <title>
            read a simple json
        </title>
    </head>
    <body>
        <button onclick="readJSON()">go</button>
        <div id="output"></div>
    </body>
    <script>
        function readJSON(){
            $.ajax({
                "url": "https://api.coindesk.com/v1/bpi/currentprice.json ",
                "method":"GET",
                "data":"",
                "dataType": "JSON",
                "success":function(result){
                    console.log(result);
                    var rate = result.bpi.EUR.rate
                    //console.log(rate);
                    document.getElementById("output").innerText = rate;
                },
                "error":function(xhr,status,error){
                    console.log("error: "+status+" msg:"+error);
                }
            });

        }
    </script>
</html>
LAB04-extra.html
<html>

<head>
    <script src="https://ajax.googleapis.com/ajax/libs/jquery/3.4.1/jquery.min.js"></script>
    <title>
        read etherium
    </title>
</head>

<body>
    <button onclick="readJSON()">go</button>
    <div id="output"></div>
</body>
<script>
    function readJSON() {
        $.ajax({
            "url": "https://min-api.cryptocompare.com/data/price?fsym=ETH&tsyms=BTC,USD,EUR",
            "method": "GET",
            "data": "",
            "dataType": "JSON",
            "success": function (result) {
                console.log(result);
                var rate = result.USD
                //console.log(rate);
                document.getElementById("output").innerText = rate;
            },
            "error": function (xhr, status, error) {
                console.log("error: " + status + " msg:" + error);
            }
        });

    }
</script>

</html>
Week 6 - AJAX and REST
What is CURL
- Client-side URL
- Used to call a URL and retrieve its response
- Handy for testing and debugging
- (I have used it to webscrape, “back in the day”)
Installation
- Come built in to Windows 10 and mac
- Other wise download the zip from https://curl.haxx.se/download.html
- Unzip it and save the curl.exe and any .dll file to a directory in your PATH variable
Some options
| Option | Description | Example |
|---|---|---|
| -i | see the response header | curl -i http://dummy.restapiexample.com/api/v1/employee/2201 |
| -X <method> | set the method | curl -i -X DELETE http://dummy.restapiexample.com/api/v1/delete/2201 |
| -d <data> | set the data to be uploaded | curl -i -H “Content-Type:application/json” -X PUT -d '{“name”:“test1”,“salary”:“1123”,“age”:“23”}' http://dummy.restapiexample.com/api/v1/update/2201 |
| -H <header> | set the header |
Conclusion
- CURL is handy for testing
- We will use in in the next lecture to test the server we are running
FlasK - introduction to app server
- What is an app-server?
- And what is a web-server?
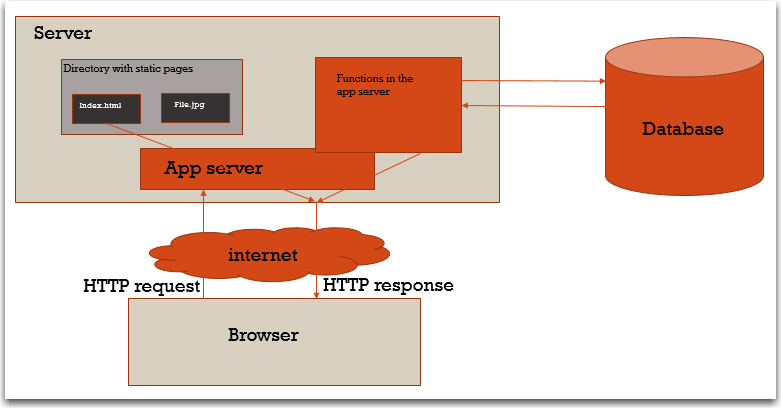
Simple FLASK
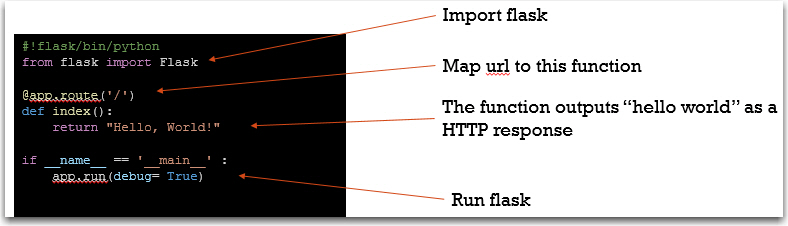
#!flask/bin/python
from flask import Flask

@app.route('/')
def index():
    return "Hello, World!"

if __name__ == '__main__' :
    app.run(debug= True)
Server static content
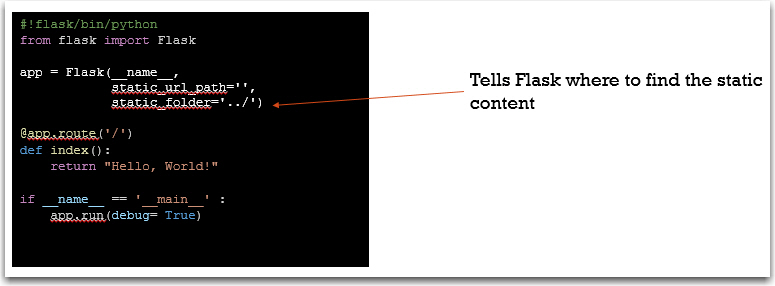
#!flask/bin/python
from flask import Flask

app = Flask(__name__,
            static_url_path='',
            static_folder='../')

@app.route('/')
def index():
    return "Hello, World!"

if __name__ == '__main__' :
    app.run(debug= True)
Get REST server working
- Copy the code and run it
Looking at the code
cars = [
    {
        "reg":"181 G 1234",
        "make":"Ford",
        "model":"Modeo",
        "price":18000
    }
   ]
- Make an array (list) for storing the cars,
- These are stored in memory, so as soon at the program ends the data is lost
@app.route('/cars', methods=['GET'])
def get_cars():
    return jsonify( {'cars':cars})
- url map for /cars for method GET (only)
- Returns the list converted in JSON
@app.route('/cars', methods=['POST'])
def create_car():
    if not request.json:
        abort(400)
    if not 'reg' in request.json:
        abort(400)
    car={
        "reg":  request.json['reg'],
        "make": request.json['make'],
        "model":request.json['model'],
        "price":request.json['price']
    }
    cars.append(car)
    return jsonify( {'car':car }),201
- Method is POST
- Check that the request has JSON data (if not return a 400 error)
- Read the request object and create a new car
- Append it to the list of cars
- Return what we just added
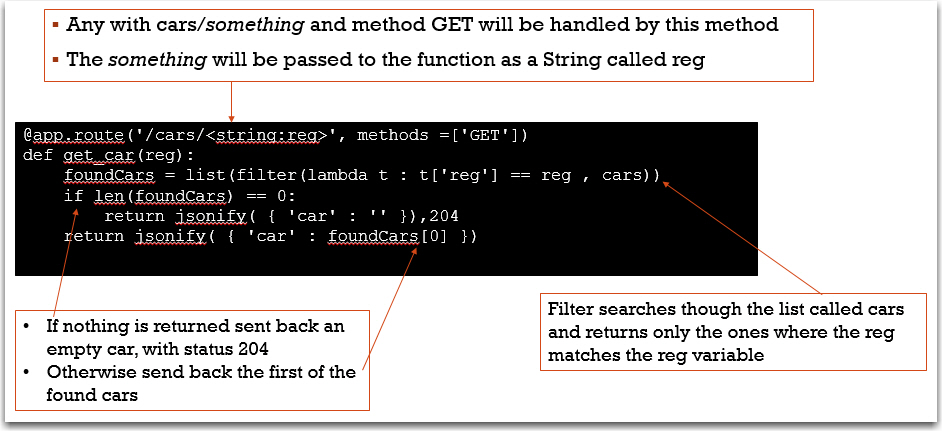
@app.route('/cars/<string:reg>', methods =['PUT'])
def update_car(reg):
    foundCars=list(filter(lambda t : t['reg'] ==reg, cars))
    if len(foundCars) == 0:
        abort(404)
    if not request.json:
        abort(400)
    if 'make' in request.json and type(request.json['make']) != str:
        abort(400)
    if 'model' in request.json and type(request.json['model']) is not str:
        abort(400)
    if 'price' in request.json and type(request.json['price']) is not int:
        abort(400)
    foundCars[0]['make']  = request.json.get('make', foundCars[0]['make'])
    foundCars[0]['model'] =request.json.get('model', foundCars[0]['model'])
    foundCars[0]['price'] =request.json.get('price', foundCars[0]['price'])
    return jsonify( {'car':foundCars[0]})
- This is a put and it takes in the reg from the URL.
- Use the the filter to find the car.
- Check that the JSON in the request is properly formatted.
- Update the car using the data from the JSON, if no matching attribute make the attribute equal to what it was before.
- Return the updated car
@app.route('/cars/<string:reg>', methods =['DELETE'])
def delete_car(reg):
    foundCars = list(filter (lambda t : t['reg'] == reg, cars))
    if len(foundCars) == 0:
        abort(404)
    cars.remove(foundCars[0])
    return  jsonify( { 'result':True })
- Similar to the previous methods
- Remove the found car from the list of cars
- Return JSON { “result” : ”true”}
@app.errorhandler(404)
def not_found404(error):
    return make_response( jsonify( {'error':'Not found' }), 404)
@app.errorhandler(400)
def not_found400(error):
    return make_response( jsonify( {'error':'Bad Request' }), 400)
- Two functions that will handle the errors 404 and 400
- They return simple JSON
Conclusion
- I will get you to write your own flask server in week08.
- For now I just want you to have an idea what is in it.
Calling server with AJAX
Test get all
<html>
    <head>
        <script src="https://ajax.googleapis.com/ajax/libs/jquery/3.4.1/jquery.min.js"></script>
        <title>
            test get all
        </title>
    </head>
    <body>
        <button onclick="getAll()">getAll</button>
        <div id="output"></div>
        <table id="carsTable">
            <tr>
                <th>reg</th><th>make</th><th>model</th><th>price</th><th></th><th></th>
            </tr>
        </table>
    </body>
    <script>
        function getAll(){
            $.ajax({
                "url": "http://127.0.0.1:5000/cars",
                "method":"GET",
                "data":"",
                "dataType": "JSON",
                "success":function(result){
                    console.log(result);

                },
                "error":function(xhr,status,error){
                    console.log("error: "+status+" msg:"+error);
                }
            });

        }
    </script>
</html>
Test Create
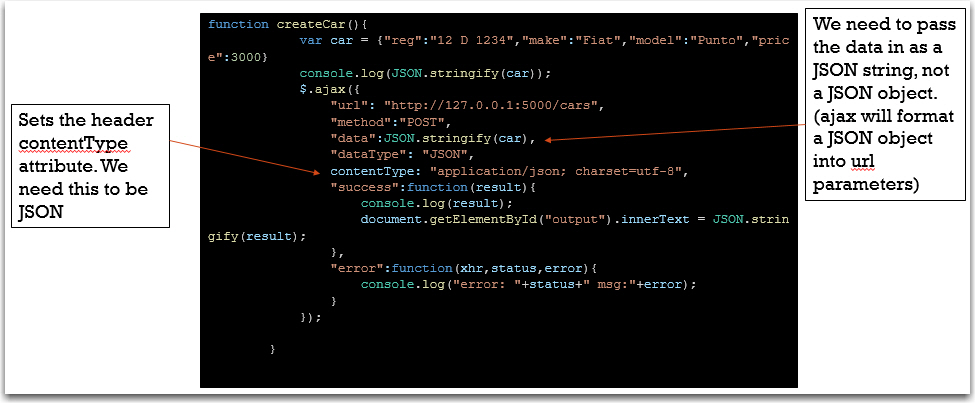
function createCar(){
            var car = {"reg":"12 D 1234","make":"Fiat","model":"Punto","price":3000}
            console.log(JSON.stringify(car));
            $.ajax({
                "url": "http://127.0.0.1:5000/cars",
                "method":"POST",
                "data":JSON.stringify(car),
                "dataType": "JSON",
                contentType: "application/json; charset=utf-8",
                "success":function(result){
                    console.log(result);
                    document.getElementById("output").innerText = JSON.stringify(result);
                },
                "error":function(xhr,status,error){
                    console.log("error: "+status+" msg:"+error);
                }
            });

        }
Test Update
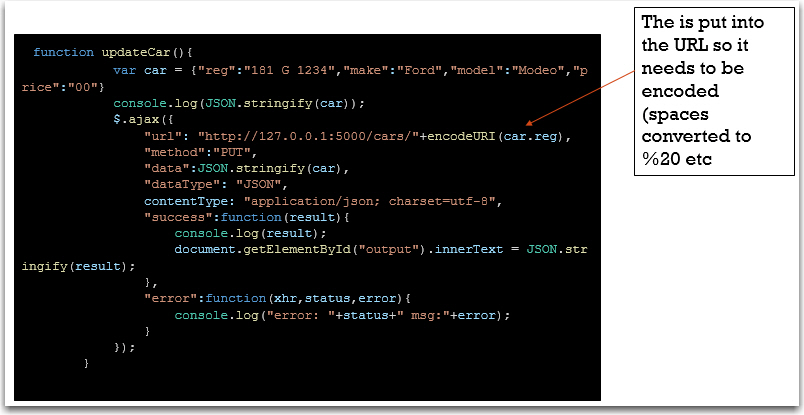
 function updateCar(){
            var car = {"reg":"181 G 1234","make":"Ford","model":"Modeo","price":"00"}
            console.log(JSON.stringify(car));
            $.ajax({
                "url": "http://127.0.0.1:5000/cars/"+encodeURI(car.reg),
                "method":"PUT",
                "data":JSON.stringify(car),
                "dataType": "JSON",
                contentType: "application/json; charset=utf-8",
                "success":function(result){
                    console.log(result);
                    document.getElementById("output").innerText = JSON.stringify(result);
                },
                "error":function(xhr,status,error){
                    console.log("error: "+status+" msg:"+error);
                }
            });
        }
Test Delete
function deleteCar(){
            var car = {"reg":"12 D 1234"}
            console.log(JSON.stringify(car));
            $.ajax({
                "url": "http://127.0.0.1:5000/cars/"+encodeURI(car.reg),
                "method":"DELETE",
                "data":"",
                "dataType": "JSON",
                contentType: "application/json; charset=utf-8",
                "success":function(result){
                    console.log(result);
                    document.getElementById("output").innerText = JSON.stringify(result);
                },
                "error":function(xhr,status,error){
                    console.log("error: "+status+" msg:"+error);
                }
            });

        }
Week 7 - Python and API
Python consuming APIs
- We can use python to do anything that we can do in CURL.
- There are many web services that have APIs, that we can consume.
- Github
- Gmail
- The server we made for the carviewer
What is needed
- Read and write JSON (usually to DICT)
  import json
  json.dump()
  json.load()
- Send HTTP requests (with requests package)
  import requests
  requests.get(url)
- Read and write to files
  f = open("../../week02/carviewer2.html", "r")
  html = f.read()
- Write to excel file
  from xlwt import *
  w = Workbook()
  w.save('cars.xls')
JSON package
- In simple terms
dump: converts Python object to JSON string and outputs to a file (dumpsreturns a string)load: read a JSON string from a file and converts to Python object (loads: read string directly
mapping
| JSON | Python |
|---|---|
| object | dict |
| array | list |
| string | str |
| number (int) | int |
| number (real) | float |
| TRUE | TRUE |
| FALSE | FALSE |
| null | None |
Python Code Sample using Json
import json

data = {
  'name':'joe',
  'age':21,
  'student':'True'}

print(data)
Code output
{'name': 'joe', 'age': 21, 'student': 'True'}
Sending HTTP requests
Use the requests module
- response = requests.get(url)
- response = requests.post(url, json=data)
- Response = requests.post(url, data=data)
The requests matches HTTP methods:
- GET,
- POST,
- PUT,
- DELETE,
- PATCH
Response has the http response
- response.json()
- response.status_code()
- response.content()
- response.data()
- response.headers()
Python Code Sample #1
import requests

url = 'https://gmit.ie'
response = requests.get(url)
print(response.status_code)
#print(response.status_text)
print(response.status_headers)
code output
200
headers ouput
{'Server': 'nginx', 'Date': 'Tue, 05 Nov 2019 08:23:04 GMT', 'Content-Type': 'text/html;
charset=utf-8', 'Transfer-Encoding': 'chunked', 'Connection': 'keep-alive',
'X-Powered-By': 'PHP/7.1.29, PleskLin', 'X-Drupal-Cache': 'HIT', 'Content-Language': 'en',
'X-Frame-Options': 'SAMEORIGIN', 'X-Generator': 'Drupal 7 (http://drupal.org)',
'Cache-Control': 'public, max-age=1800', 'Expires': 'Sun, 19 Nov 1978 05:00:00 GMT',
'Vary': 'Cookie,Accept-Encoding', 'Content-Encoding': 'gzip', 'X-Content-Type-Options':
'nosniff', 'Etag': '"1572939088-1"', 'Last-Modified': 'Tue, 05 Nov 2019 07:31:28 GMT'}
Python code example #2
Python code
import requests
url = 'http://127.0.0.1:5000/cars'
data = {'reg':'123','make':'blah', 'model':'blah','price':1234}
response=requests.post
print(response.status_code)
print(response.json())
Code output
201
{'car':{'make': 'blah', 'model': 'blah', 'price': 1234, 'reg': '123'}}
Files
- It is assumed that you have covered reading and writing to files previously
Method One
with open(filename, 'w') as f:
        json.dump(data, f, indent=4)
Method Two
f = open("demofile.txt", "rt")
Data= json.load(f)
Excel
- There are a lot of packages in Python for Excel
- We are using xlwt (simple built in package)
from xlwt import *
w = Workbook()
ws = w.add_sheet('cars’)
ws.write(0,0, "data1")

row = 1
col = 1
ws.write(row,col, "data")
w.save('cars.xls')
Conclusion
- We can use python to do anything we can do in CURL.
- This opens up all the webservices that have an API.
- We will look at security next
API keys and OAUTH
Restricting access
- A resource owner may want to restrict access to the resource.
- May not want anyone to:
- change data
- View sensitive data (your bank details)
- May want to limit the amount of times someone can make a request, especially if the request will take a lot of processing. E.g. searching twitter feeds.
API Keys
- API keys exist, and can be used to provide authorisation to access resources
- The resource owner can generate a key can give it to a third party, to allow the third party access to the resource.
- Hotel key
- In practice:
- Get a key:
- Apply for a key from the resource owner
- Log in and generate a key
- Include it in the request to access the resource
- Put it in the URL (GET) as a
parameter - Put it in the header as a attribute
parameter - Just like any other bit of data
import requests import json
Demo 1
#html = '<h1>hello world</h1>This is html'
f = open("../../week02/carviewer2.html", "r")
html = f.read()
#print (html)

apiKey = '46ceed910c24ff7cce8240e89ec7b71912f6f40f2ec55fd217ce150ad6d4f1c4'
url = 'https://api.html2pdf.app/v1/generate'

data = {'html': html,'apiKey': apiKey}
response = requests.post(url, json=data)
print (response.status_code)

newFile = open("lab06.02.01.htmlaspdf.pdf", "wb")
newFile.write(response.content)
Demonstration 2 Github
- We saw in the last lecture that github has an API, and used it to get public information
- We can use the api get private information and make commits to the repository
- Setting ⇒ generation a API key
- Use the key in requests
requests.get(url, auth=('token',apiKey))
- I have made a github account for this user: datarepresentationstudent
- Key: b4ddb9e5603da11cd857b83bad6ea6eb1819b92d
- More info
import requests
import json

apiKey = 'f59b1cdb743ce0ab9b21a94ac246b02f06ee2d85'
url = 'https://api.github.com/repos/datarepresentationstudent/aPrivateOne'
filename ="repo.json"

response = requests.get(url, auth=('token',apiKey))

repoJSON = response.json()
#print (response.json())

file = open(filename, 'w')
json.dump(repoJSON, file, indent=4)
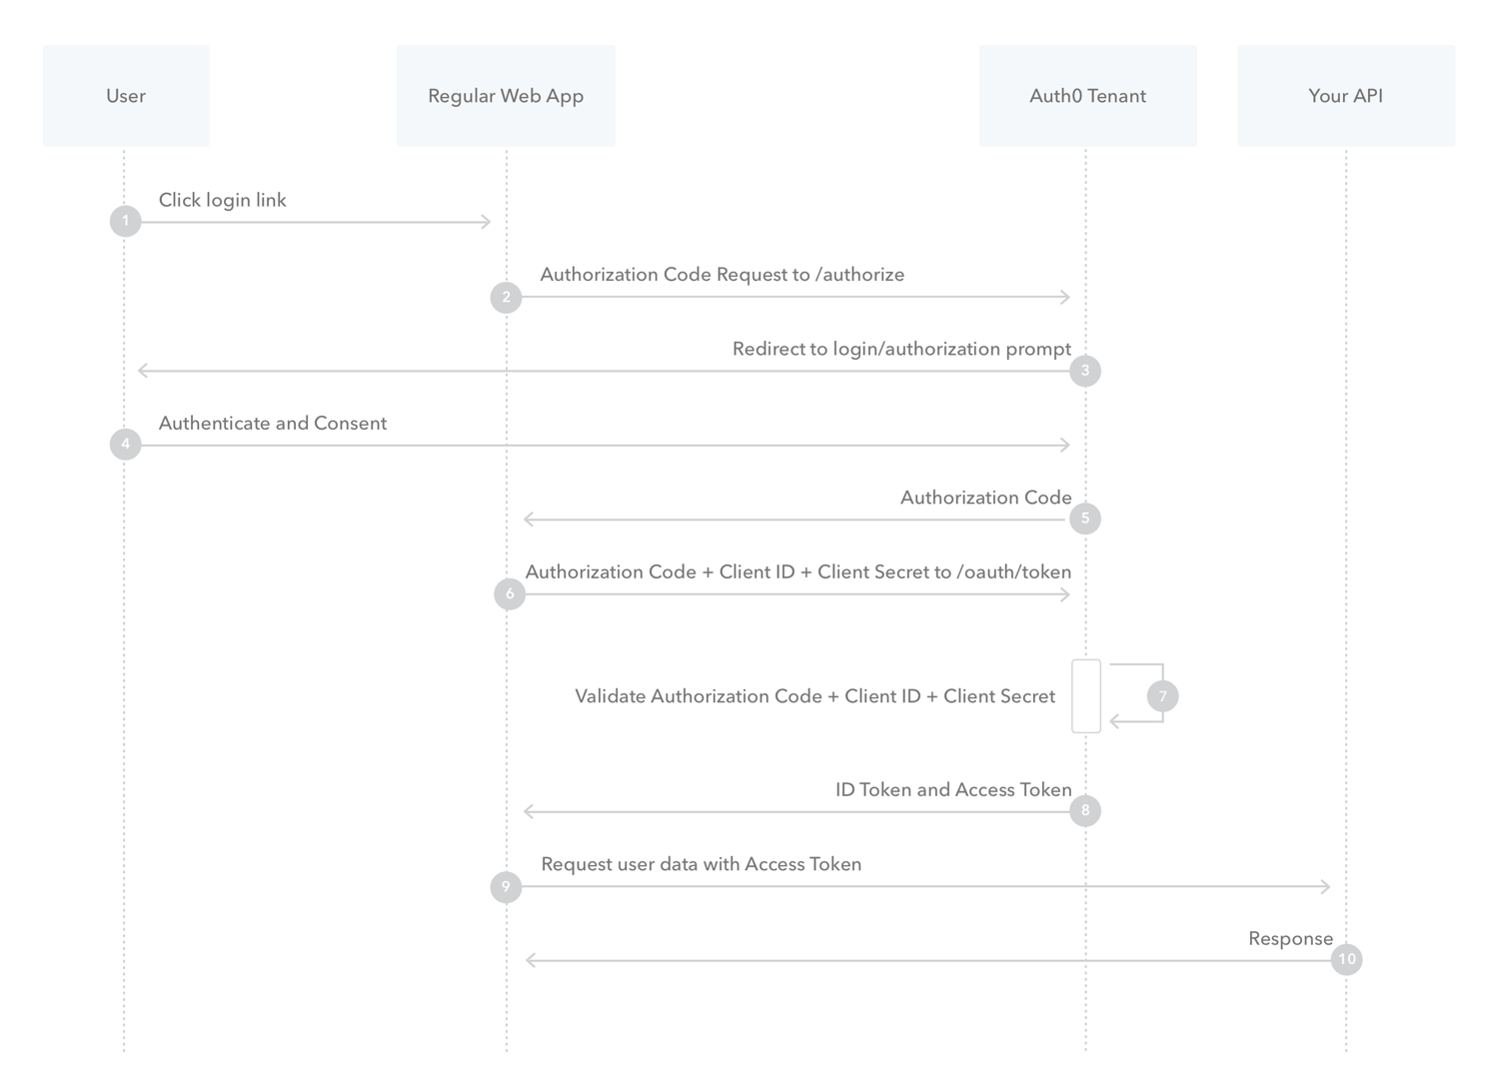
A bit more on OAuth
- OAuth1 and OAuth2
- Lots of different use-cases
- 2 legged
- Resource owner of a techy and can get the key from the authorisation server
- 3 legged
- Resource owner is not a techy, so we need to write the code to get the key from the authorisation server.
- This is beyond the scope of this course….. But worth a quick explanation

Conclusion
- You may need keys to access the a resource
- Log on the resource server
- Get the key
- Include it in the requests
References
- JSON package:
- Requests
- Files
- Excel
Week 8 - Server side
Flask and virtual environments
What is in this weeks Lectures
- Re-visit of Flask and virtual environments
- Walkthrough of creating an App Server (and designed API)
- A basic one
- for a voting application
- Hosting your app server
- Azure
- Python anywhere
What is an App-server?
and what is a web-server?

virtual environment
- What problem does a virtual environment solve?
- The more Python projects you have, the more likely it is that you need to work with different versions of Python libraries, or even Python itself. Newer versions of libraries for one project can break compatibility in another project.(from documentaiton)
- on linux/mac
python -m venv venv
.\venv\scripts\activate.psl

source venv/bin/activate
- On windows ( I have not tested this, yet)
virtualenv env
\path\to\env\scripts\activate
To save all the packages
pip freeze
pip install flask
pip freeze > requirements.txt
To install them again
pip install -r path/to/requirements.txt
Simple Flask
#!flask/bin/python
from flask import Flask

app = Flask(__name__)

@app.route('/')
def index():
    return "Hello, World!"

if __name__ == '__main__' :
    app.run(debug= True)
Starting Application
- Two ways, what we know
python b_restserver.py
- And using Flask command
- This has the advantage or being able to set environmental variables, so your server can run differently depending on whether is is in the cloud or on your own machine.
- Eg debug mode: export FLASK_DEBUG=1
- Linux mac
export FLASK_APP=b_restserver
flask run
- Windows (not tested yet)
set FLASK_APP=b_restserver
flask run
- We will see more on this when uploading to Azure
pip install flask_cors
from flask_cors import CORS
Flask
- Routing (URL mapping)
@app.route('/user’, methods=['GET', 'POST'])
- Variables in route (URL)
@app.route('/user/<username>')
@app.route('/user/<int:post_id>’)
- Use the url_for() function to generate a url to a particular function
@app.route('/')
def index():
	return 'index’

#somewhere else
print(url_for(index)
# will print out /
- Rendering Templates vs JSON
- Flask can be used to create html pages on the fly
As oppose to
- Just returning the data and allowing the static web pages use AJAX to get that data.
- We use the latter method
Flask
To access request data import request object
from flask import request
See the code we did in week05
"reg": request.json['reg'],
Other data you can get
- request.path ⇒ /user
- request.method ⇒ GET
- request.form ⇒ form data
- request.args ⇒ arguments from the URL
- request.files[‘the_file’] ⇒ an uploaded file
Flask
- aborts and redirects
from flask import abort, redirect, url_for

@app.route('/')
def index():
	 return redirect(url_for('login'))

@app.route('/login')
def login():
	abort(401)
	this_is_never_executed()
Flask
- Sessions
- Allow data to be stored between requests (e.g is a user is logged in)
- I will go through this in week 10 when I go through authorisation (login)
- Flashing
- Logging
- More data (link in references)
https://buildmedia.readthedocs.org/media/pdf/flask/latest/flask.pdf
Creating web-applications and designing example APIs
REST - a server for the project
Requirements
- An app server that has a RESTful interface to provide CRUD operations for one database table
- I am going to pick something at random like a book, you should choose your own entity
- A Book will have
- An id (Integer, auto increment) KEY i.e. this will be the unique identifier
- A title
- An Author
- A price (integer, the price in cent)
- There are other attributes it could have ISBN (this could have been the unique identifier, I choose to use an ID instead to make this as general as possible.
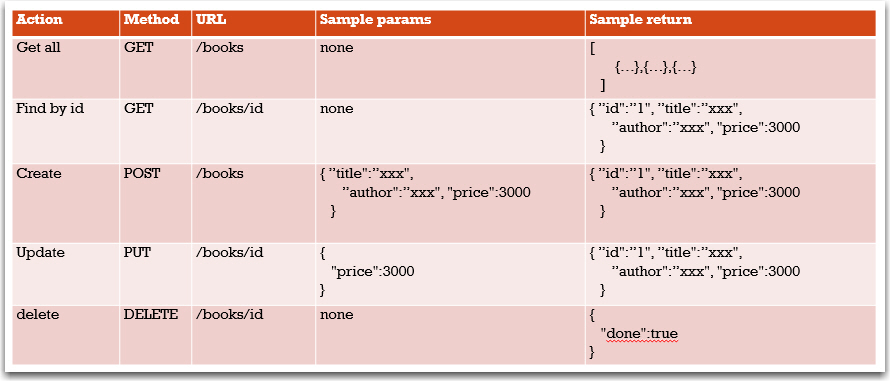
Step 1: design the API
- This is just a CRUD interface so this will be similar to app server we created in week05
- It will need to allow us
- Get all books
- Get a book by id (might not actually be needed, but I am putting it in anyway)
- Create a book
- Update a book
- Delete a book
- Other applications may require other functionality in the interface. And we can always add functionality later.
- NOTE: no code yet
Proposed interface
Step2 : make app-server with skeleton functions
- OK Now we start to code
- Make a very basic appserver, test it.
- Add a function and URL map for each of the functions we require in our interface. Each function should just return text saying what they are. Test them using CURL
STEP3: write the code for each of the functions
- For this stage we will not link to a database, we will just store the books in a list like we did in week 05.
- Do the get all first that should be the easiest, TEST if with CURL
- Do find by id, TEST IT
- Do create, TEST IT
- Do update, TEST IT
- Do delete, TEST IT
REST - a server for a voting app
Requirements
- We are having a get lippy competition in the college on the 5 December in the IVY tower in Castlebar (you are welcome to come).
- One of the organisers has asked me to create an application that will allow the people on the desk register votes for each act.
- We are going to make this a very very basic application, no authentication.
- The users will go to a website, pick from a list of acts and add a number of votes to that acts tally (not just one vote)
- I am not looking at the web interface for problem, just the server
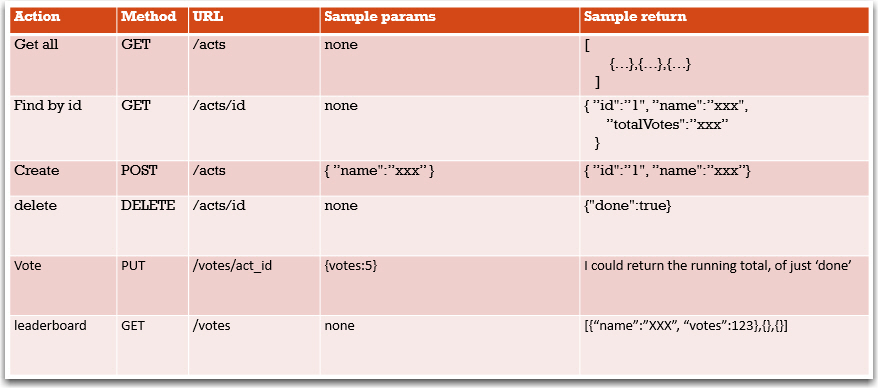
Step 1: design the API
- There are two types of users we think about
- The person (admin) who sets up all the act names (probably me, so I could just enter them directly into the data base table….. But it should be through a web interface)
- The person on the desk (User) they need to:
- View all the acts (just their names)
- And register a number of votes for each act
- View the sum of all the votes for each act
- I could just have one entity for this called act, but I am going to have two act and vote
Proposed Solution
Step2 : make app-server with skeleton functions
- OK Now we start to code
- Make a very basic app-server, test it.
- Add a function and URL map for each of the functions we require in our interface. Each function should just return text saying what they are. Test them using CURL
STEP3: write the code for each of the functions
- For this stage we will not link to a database, we will just store the acts (and votes ) in a list(s) like we did in week 05.
- I suggest that we do the CRUD on the acts first.
- Then the two votes function.
- NOTE: the interface allows us to implement this in a number of ways,
- Either two entities,
- Or just store the running total in each act.
- I am choosing the former.
Hosting web-applications on the cloud
References
Virtual environment
Using Flask
hosting on Azure, tutorial:
Hosting on PythonAnywhere
Database
- We will be using MySQL(a relational database)
- other databases are
- MongoDB
- SQLLite
- PostGres
- Install it
- Windows I recommend WAMP
- MAC/Linux install MySQL and MySQLWorkbench
sql
- The language to interact with is SQL
- Structured Query Language
- Tutorial on W3schools
some commands
SHOW DATABASES;
CREATE DATABASE test;
USE test
CREATE TABLE test{
   id INT NOT NULL AUTO_INCREMENT,
   name VARCHAR(250),
   PRIMARY KEY(id)
};

INSERT INTO test (name) VALUES ('jow');

SELECT * FROM test;

UPDATE test SET name='blah' WHERE id = 1;
DELETE FROM test WHERE VALUE =1;
MySQL Connector
- We will use mysql's mysql-connector
- Can use SQLAlchemy, which does ORM(so same code will connect to any database)
- Install
pip install mysql-connector
Use
import mysql.connector
mydb = mysql.connector.connect(
 host="localhost",
 user="root",
 password=""
)
mycursor = mydb.cursor()
mycursor.execute("CREATE DATABASE datarepresentation	")
Prevent SQL Injection
sql = “insert into student (name, address) values (%s, %s)” values=(“Mary”, “Galway”)
import mysql.connector
db = mysql.connector.connect(
 host="localhost",
 user="root",
 password="",
 database="datarepresentation"
)
cursor = db.cursor()
sql="insert into student (name, address) values (%s,%s)"
values = ("Mary", "Galway")
cursor.execute(sql, values)
db.commit()
print("1 record inserted, ID:", cursor.lastrowid)
Get Data out
# get connection code here

cursor = db.cursor()
sql = "Select * from student where id = %s"
values = (1, )

cursor.execute(sql, values)
result = cursor.fetchall()
for x in result:
   print(x)
Put into a file that can be reused
- Make a class put all the functions into it
- Make an instance of that class
- Import into another filer (will be flask later)
Linking server to Database
in this video
- Convert the server we did, so that it uses a database to store the data and not a list in memory
- I will use the sample DAO that we did in the last lecture
- In this walkthrough I convert the getAll and findById.
- I realise while trying to do the create that I am working on the student table and not a book table, but as you can see it makes no difference.
Converting a Tuple to Dictionary Object
- I think that I should do this in the DAO functions
- Create a dictionary object and populate it with values taken from the databse
- I can create an array of attribute names and iterate through it atking the matching values
- that will work for one item being returned, it is going to be a but clunky for the getAll
Find by ID
def findById(id):
    foundBook = studentDAO.findByID(id)

    return jsonify(foundBook)
Create
- The student DAO takes in a tuple of values in order that they appear on the database.
- This is not the most robust way of doing this, but will do for the moment
Configuration files
- Different configurations depending on where your applications is run.
- Eg.
- Are you developing on different machines, i have a PC in my office and a mac at home
- Production machine (needs a more secure database)
- Testing machines
- Colleagues machines
- We have already seen requirements.txt
- We need away for storing environment specific variable
One way
- A python file that has the variable in an object
- Import that file into yours and use it
- Make sure you do not put it into github ie use .gitignore
- A copy of this file will have to be made for each environment.
mysql ={
        'host':'localhost',
        'user':'root',
        'password':'my secret password',
        'db':'write-math'
}
import databaseconfig as cig

connect(cfg.mysql['host'], cfg.mysql['user'], cfg.mysql['password'])
Connect to DB on PythonAnywhere
Setup
- I assume that:
- you have a server that connects to your local database.
- You are using a configuraion file for the credentials for the database
ToDo
- Create a password for the remote DB.
- Create the table on mysql
- Upload the full server
- Make dbconfigfile
- Test it
Remote DB
- Create password
- Note credentials
- Create table
Step 2
- Copy server code to repository on local machine, test it
- Upload the server and pull to host
- Create a dbconfig.py file for DB
- Make sure the web-app configuration is good
- TEST IT